Building & Installing
Note
GGEMS is written in C++ and using the OpenCL C++ API. However, the most useful GGEMS functions have been wrapped to be called in python version 3. Python is not mandatory, GGEMS can be used only in C++ too. Lot of C++ and python examples are given in this manual.
Prerequisites
GGEMS code is based on the OpenCL library. For each platform (NVIDIA, Intel, AMD) in your computer, you have to install a specific driver provided by the vendor.
NVIDIA
Linux & Windows
CUDA and NVIDIA driver have to be installed if you want to use GGEMS on a NVIDIA architecture. The easiest way to install OpenCL on NVIDIA platform is to download CUDA and NVIDIA driver in the same time from the following link: https://developer.nvidia.com/cuda-downloads.
GGEMS has been tested on the lastest CUDA and NVIDIA versions, and also some older versions.
Warning
CUDA is not used in GGEMS, but the OpenCL library file in included in CUDA folder.
Warning
It is recommanded to install CUDA and the NVIDIA driver directly from the NVIDIA website. Using packaging tool (as apt) is very convenient but can produce some troubles during GGEMS executation.
INTEL
Linux & Windows
Using GGEMS on Intel architecture require Intel driver. More information about Intel SDK for OpenCL applications can be find in the following link: https://software.intel.com/content/www/us/en/develop/tools/opencl-sdk.html. Both drivers for Linux and Windows can be downloaded here: https://software.intel.com/content/www/us/en/develop/articles/opencl-drivers.html
AMD
Linux & Windows
AMD platform has not be tested, but surely with few modifications GGEMS will run on a AMD platform. The correct driver for CPU and/or GPU should be available on the following link: https://www.amd.com/en/support. Don’t hesitate to contact the GGEMS team if you need help for AMD implementation. For the next releases, AMD platform will be tested and validated.
Important
All previous drivers have to be installed before to install GGEMS. Install NVIDIA driver before Intel driver is recommanded, if using GGEMS on both architecture is required.
GGEMS Installation
CMAKE is required to install GGEMS. The minimal CMAKE version is 3.8.
Linux
Intel and/or NVIDIA drivers are supposed to be installed. Download GGEMS from the website, or from a terminal:
$ wget https://ggems.fr/download/ggems_v1.0.zip
Unzip the downloaded file, create a folder named GGEMS_build (or another name), and launch the command ‘ccmake’. Create an install folder is recommanded.
$ unzip ggems_v1.0.zip
$ mkdir GGEMS_build
$ mkdir GGEMS_install
$ cd GGEMS_build
$ ccmake ../GGEMS

Note
By default, the GNU compiler is used on Linux. CLANG can also be used. The compiler can be modify in the CMakeLists.txt file and empty the CMAKE cache.
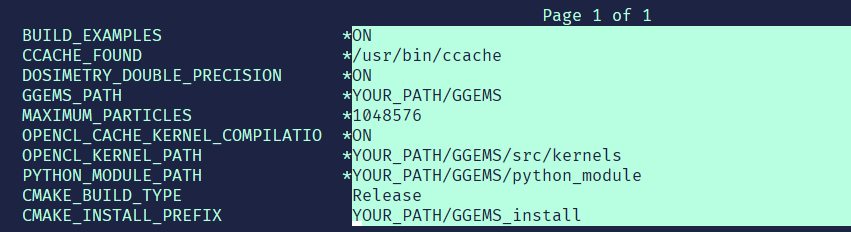
In the previous images ‘YOUR_PATH’ is automatically found by CMAKE. CMAKE parameters shown previously are explained here. Last step, compile and install GGEMS.
$ make -jN
$ make install
Final step, configuration of your environment. There are many ways to do that. Since GGEMS is a library, you have to indicate its location in your environment file (.bashrc for instance).
export LD_LIBRARY_PATH=$LD_LIBRARY_PATH:YOUR_PATH/GGEMS_install/ggems/lib
To load permanently the GGEMS python module, we also recommand to add the following line in your environment file
export PYTHONPATH=$PYTHONPATH:YOUR_PATH/GGEMS_install/ggems/python_module
export PYTHONPATH=$PYTHONPATH:YOUR_PATH/GGEMS_install/ggems/lib
GGEMS is now installed on your system. To test the installation, try to launch GGEMS examples or load the GGEMS python module from python console.
from ggems import *
opencl_manager.print_infos()
opencl_manager.clean()
exit()
Windows
Note
The following installation process for Windows is done using the classical Windows command prompt. Visual Studio is the compiler by default. CLANG can be selected by modifying the CMakeLists.txt file.
Important
Only Visual Studio (CL) and CLANG are validated on Windows. GNU GCC is not recommanded.
Visual Studio is assumed well configured. The command ‘cl.exe’ should be recognize in your command prompt. If not, there some useful commands to configure Visual Studio 2019 in a batch script file (named ‘set_compilers.bat’ for instance). If a previous version of Visual Studio code is installed on your computed, you might modify this script.
@echo OFF
if "%VCTOOLKIT_VARS_ARE_SET%" == "true" goto done

echo --- Setting Microsoft Visual C++ Toolkit 2019 environment variables... ---

call "C:\Program Files (x86)\Microsoft Visual Studio\2019\Community\VC\Auxiliary\Build\vcvarsall.bat" x86_amd64

set PATH="%VCToolkitInstallDir%"\bin;%PATH%
set INCLUDE="%VCToolkitInstallDir%"\include;%INCLUDE%
set LIB="%VCToolkitInstallDir%"\lib;%LIB%

set VCTOOLKIT_VARS_ARE_SET=true
echo Done.
:done
Calling the previous script typing the following command:
C:\Users\XXX> set_compilers.bat
Download GGEMS from the website. Unzip GGEMS in your environment folder (for instance C:\Users\XXX). Then create both GGEMS_build and GGEMS_install folder.
C:\Users\XXX> md GGEMS_build
C:\Users\XXX> md GGEMS_install
Go to the build folder and launch CMAKE.
C:\Users\XXX> cd GGEMS_build
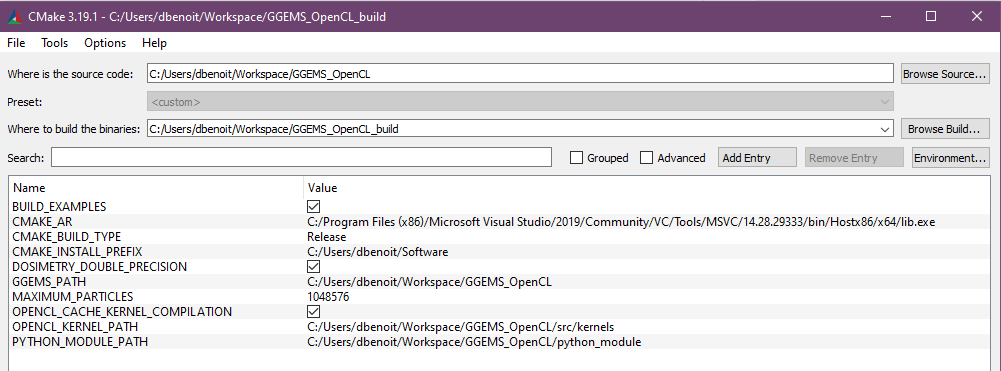
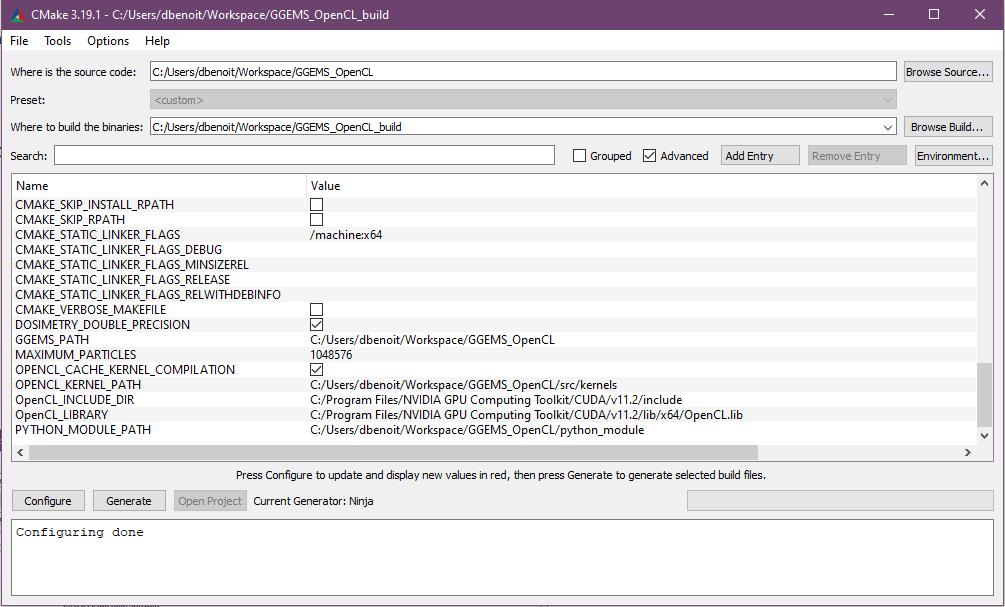
C:\Users\XXX\GGEMS_build> cmake-gui
Note
For multithreaded compilation it is recommanded to use Ninja generator and not nmake. Ninja can be install as a package during visual studio installation or directly from here https://ninja-build.org/
Important
Order during installation of NVIDIA and Intel driver could be important. To check that, go to your environment variables in PATH variable and check which OpenCL library is call first. NVIDIA OpenCL library should be called first.
Final step, compilation and installation using nmake or ninja.
C:\Users\XXX\GGEMS_build> nmake install
or
C:\Users\XXX\GGEMS_build> ninja install
GGEMS have to be set in your environment variables by creating (or add an entry) a PYTHONPATH variable and add an entry to the PATH variable. The following batch script can do that for you in the command prompt.
@echo OFF
if "%GGEMS_VARS_ARE_SET%" == "true" goto done

echo --- Setting GGEMS... ---
set PYTHONPATH=%PYTHONPATH%;C:\Users\XXX\GGEMS_install\ggems\python_module
set PYTHONPATH=%PYTHONPATH%;C:\Users\XXX\GGEMS_install\ggems\lib
set PATH=%PATH%;C:\Users\XXX\GGEMS_install\ggems\lib

set GGEMS_VARS_ARE_SET=true
echo Done.
:done
GGEMS is now installed on your system. To test the installation, try to launch GGEMS examples or load the GGEMS python module from python console.
from ggems import *
opencl_manager.print_infos()
opencl_manager.clean()
exit()
CMAKE Parameters
BUILD_EXAMPLES
By default this option is set to ON. During the installation all C++ executables are copied to the respective example folder.
CMAKE_INSTALL_PREFIX
Path to your installation folder
DOSIMETRY_DOUBLE_PRECISION
By default this option is set to ON. For dosimetry the computation are in double float precision.
GGEMS_PATH
Path found automatically by CMAKE. It corresponds to GGEMS source folder.
MAXIMUM_PARTICLES
By default the batch of maximum particles simulated by GGEMS is 1048576. This number can be higher depending on your graphic cards.
OPENCL_CACHE_KERNEL_COMPILATION
By default this option is set to ON. It means the compiled OpenCL kernels are stored in the cache folder during the compilation process. It’s recommanded to set this option to OFF, if you want modify code inside an OpenCL kernel and delete the OpenCL cache too.
OPENCL_KERNEL_PATH
Path to GGEMS OpenCL kernels. This path is automatically found by CMAKE.
PYTHON_MODULE_PATH
Path to GGEMS python module. This path is automatically found by CMAKE.